
Let visitors send photos back
Visitors to a share can send their own photos and videos into it, for example guests adding their pictures to a wedding album. The photos go straight into the album in Immich and appear in the gallery for everyone, unless you choose to review them first.
IMPORTANT
No Immich API key is needed: each file is sent with the share's own key, so Immich itself decides whether that share accepts uploads.
Visitors have no access to Immich; the upload service streams each file through and stores nothing.
Contents
- How it works
- What you need
- Add the upload service
- Route it through your reverse proxy
- Turn on uploads for a share
- Set a storage quota
- Request size limits
- Get a notification for each upload
- Turn uploads off
- Questions
How it works
Uploads are handled by a second, optional container, immich-public-proxy-upload. The IPP container stays read-only.
No API key is required.
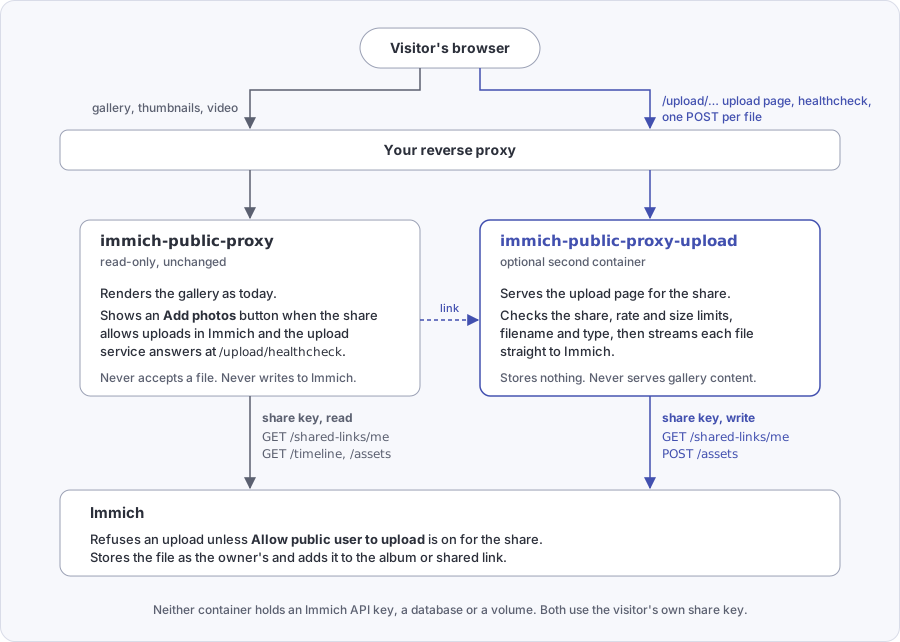
- In Immich, the owner turns on Allow public user to upload for a shared link. The gallery for that share then shows an Add photos button.
- A visitor clicks the button. It opens the upload page for the same share on the upload service's separate container.
- The upload container streams the file straight to Immich with the share's own key. It stores nothing and holds no API key.
- Immich checks that the share still allows uploads, stores the file as if the share owner had uploaded it, and adds it to the share.
What the owner sees in Immich:
- The files appear at once in the owner's timeline, at the date each photo was taken, as with any upload. They belong to the owner and count against the owner's storage.
- In an album share, the files go into the album. In a share of selected photos, they go into the shared link, so they show in the same gallery.
- Each file name starts with
ipp_upload_, so visitor uploads are easy to find in search or to tag with a workflow. - The owner removes unwanted files in Immich, like any other photo.
Other visitors see the new photos in the gallery within a few minutes. See When do uploads appear. To approve photos before they appear, use a review workflow.
What you need
- IPP 4.0 or newer and Immich 3.0.0 or newer.
- A public route to the upload service, either:
- a path on the IPP hostname, such as
photos.example.com/upload, or - its own hostname, such as
upload.example.com. Use this if a tunnel points straight at IPP with no reverse proxy: add a second hostname to the tunnel for the upload container.
- a path on the IPP hostname, such as
Add the upload service
Add the service to the docker-compose.yml that runs IPP:
services:
  immich-public-proxy:
    # ... your existing IPP service ...

  ipp-upload:
    image: alangrainger/immich-public-proxy-upload:latest
    container_name: ipp-upload
    restart: always
    ports:
      - "3001:3000"
    read_only: true
    cap_drop:
      - ALL
    security_opt:
      - no-new-privileges
    environment:
      IMMICH_URL: http://your-internal-immich-server:2283
      PUBLIC_BASE_URL: https://photos.example.com
    healthcheck:
      test: curl -sf -m 4 http://localhost:3000/healthcheck -o /dev/null || exit 1
      start_period: 10s
timeout: 5sIMMICH_URLandPUBLIC_BASE_URLmean the same as on the IPP container, so you can copy theenvironmentblock across.PUBLIC_BASE_URLis IPP's public URL; it gives the upload page a back button to the gallery.read_only,cap_dropandsecurity_optlock the container down. They are optional: the service writes nothing to disk and needs no extra privileges, so it runs the same with or without them.
The service has no setting for its own public URL. Your reverse proxy decides that in the next step.
Start it with docker-compose up -d. The full list of settings is on Upload service.
Route it through your reverse proxy
The upload service serves its pages both under /upload and at the root, so it fits either of these shapes with no URL setting. The examples reach the container as ipp-upload:3000, which works when the proxy shares a Docker network with it. From the host, use the published port instead: localhost:3001 with the compose file above.
Path on the IPP hostname
One domain, no extra certificate. Forward /upload/* to the upload service with the path left in place, and everything else to IPP.
Caddy
Use handle, which keeps the path; handle_path would strip it.
photos.example.com {
    handle /upload/* {
        reverse_proxy ipp-upload:3000
    }
    handle {
        reverse_proxy immich-public-proxy:3000
    }
}
nginx
server {
    listen 443 ssl;
    server_name photos.example.com;

    location /upload/ {
        client_max_body_size 500m;
        proxy_request_buffering off;
        proxy_pass http://ipp-upload:3000;
    }

    location / {
        proxy_pass http://immich-public-proxy:3000;
    }
}
Own hostname
Send everything on a separate upload hostname to the upload service.
Caddy
upload.example.com {
    reverse_proxy ipp-upload:3000
}
nginx
server {
    listen 443 ssl;
    server_name upload.example.com;

    client_max_body_size 500m;
    proxy_request_buffering off;

    location / {
        proxy_pass http://ipp-upload:3000;
    }
}
Tell IPP the upload URL
Set uploadUrl in IPP's config to the upload hostname and restart IPP:
{
  "ipp": {
    "uploadUrl": "https://upload.example.com"
  }
}
IPP reads its config from a config.json mounted at /app/config.json, or inline from the CONFIG environment variable; see Configuration. One config.json can serve both containers: IPP ignores the ipp.upload.* keys, and the upload service reads only those and two shared options.
Check the route
Open /healthcheck on the upload URL: https://photos.example.com/upload/healthcheck or https://upload.example.com/healthcheck. It answers ok when the upload service can reach Immich, and a 503 when it cannot. With the upload service on a path on the IPP hostname, IPP shows the Add photos button only while this answers ok. With its own hostname, IPP shows the button whenever uploadUrl is set.
Turn on uploads for a share
In Immich, turn on Allow public user to upload for the shared link. The option is in the dialog that creates a link, and later under Sharing > Shared links, when you edit the link. The gallery for that share then shows an Add photos button in its header. A share with the option off shows no button, and the upload service refuses it.
A password-protected share asks for its password again on the upload page. The upload service keeps its own unlock, separate from IPP's, and the password never passes between the two.
NOTE
A share with one photo opens as the image file itself, so there is no header and no button. Set gallery.singleImage to true to show a gallery page instead, or give visitors the upload page's own link: the share's path on the upload URL, such as https://photos.example.com/upload/share/<key>.
(Optional) Set a storage quota
By default an Immich user has unlimited storage. Set a quota on the user who owns the shares that accept uploads, so visitors cannot fill the disk: in Immich go to Administration, User Management, edit the user and set Quota Size (GiB). Immich refuses uploads past the quota, whatever IPP's own limits allow.
The upload service also caps each share at 10 GB per hour by default. See upload.byteBudget.
Request size limits
The upload service accepts files up to 500 MB by default (upload.maxFileSize), but anything in front of it can impose a lower limit. A file over that limit fails with "Too large for this server".
- Caddy and Traefik set no request size limit by default.
- nginx allows 1 MB by default. Set
client_max_body_sizeto at leastmaxFileSize, andproxy_request_buffering offso nginx streams each file through instead of storing it first. Both are in the examples above. - Cloudflare refuses requests over 100 MB on the Free and Pro plans, Cloudflare Tunnel included, so larger videos cannot pass through it. Set
maxFileSizeto100so the page tells visitors before the upload starts:
{
  "ipp": {
    "upload": {
      "maxFileSize": 100
    }
  }
}
Get a notification for each upload
Set upload.notifyUrl to a URL that receives a JSON message for each stored file. Gotify needs nothing more; ntfy needs the template parameters shown on the reference page.
To tag uploads or hold them back until you approve them, see Tag and review visitor uploads.
Turn uploads off
For one share, turn off Allow public user to upload in Immich. Immich refuses new uploads at once, and the button leaves the gallery on the same cache times as a new photo takes to appear (see When do uploads appear). For all shares, stop the upload container; with the default uploadUrl the button goes with it. To make sure, set uploadUrl to "".
Questions
When do uploads appear
The owner sees them in Immich at once. Other visitors see them in the gallery once three things have happened:
- Immich has made the thumbnail. That takes seconds for a photo and longer for a video, and IPP hides a photo until then.
- IPP's cache of the share has expired. It is kept for up to 2 minutes.
- The visitor's browser has fetched the gallery page again. It keeps the page for
gallery.cacheTime, 5 minutes by default.
So a new photo can take up to about 7 minutes to show for a visitor who already had the gallery open.
What happens when a visitor sends a photo the owner already has
Immich keeps the one copy and adds it to the share. The visitor's list shows the file as a duplicate.
Can visitors see who uploaded what, or remove photos
No. The upload page shows nothing from the share, only the visitor's own uploads in progress, and nothing can be deleted or edited from it. The owner manages uploads in Immich.
Why does the rate limit count all visitors together
Behind a reverse proxy every visitor reaches the upload service from the proxy's address, so upload.rateLimit applies to all visitors of a share together. To limit each visitor separately, set a rate limit in your reverse proxy.